Annotation Set Creation/Update
A new annotation set can be created by clicking the New Annotation Set button on the Annotation Sets management page. The creation form allows defining all general properties of the annotation set.
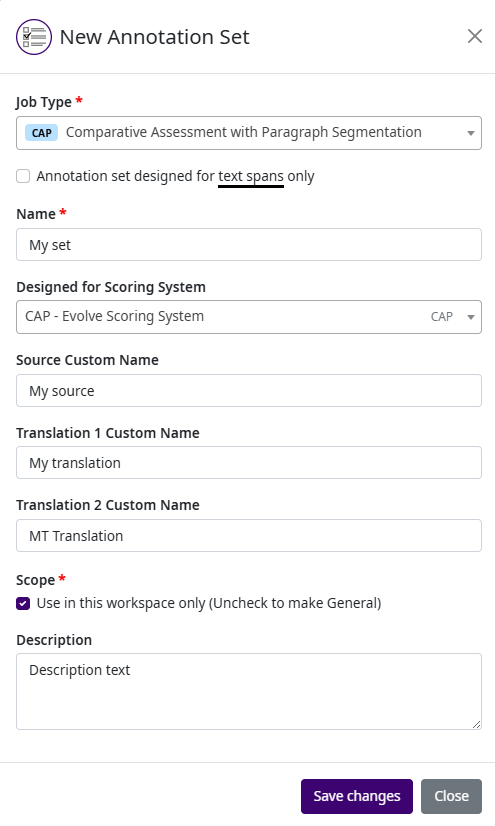
The form contains the following fields:
Field |
Required |
Description |
|---|---|---|
Job Type |
Yes |
The HEVAL job type for which this annotation set will be used (e.g. CAA, CAP, QAA, QAP). The selected job type determines which tabs and options are available in the field configuration. |
Span Annotation |
Yes |
Enables or disables span annotation mode. When enabled, evaluators can select substrings (spans) within the source, translation 1, or translation 2 text and annotate them individually. This is a special type of annotation applied to selected text ranges rather than to the entire segment. |
Name |
Yes |
The display name of the annotation set. |
Designed for Scoring System |
No |
When a scoring system is selected, the annotation set will only be available in the new job form for that specific scoring system. Additionally, values used in field conditions should correspond to the values defined in the selected scoring system. |
Custom Name for Source |
No |
Allows redefining the label displayed for the Source column on the evaluation form. If left empty, the default label is used. |
Custom Name for Translation 1 |
No |
Allows redefining the label displayed for the Translation 1 column on the evaluation form. If left empty, the default label is used. |
Custom Name for Translation 2 |
No |
Allows redefining the label displayed for the Translation 2 column on the evaluation form. If left empty, the default label is used. This field is only applicable for job types that support two translations (e.g. CAA, CAP). |
Scope |
Yes |
Defines the visibility of the annotation set:
|
Description |
No |
An optional description providing additional details about the purpose or usage of the annotation set. |
When all required fields are filled in, click the Save button to create the new annotation set. The set will then appear in the annotation set list on the left side of the management page, and you can proceed to add fields to it.
Note
The same form is used when editing an existing annotation set. To edit, select the set from the list and modify the desired properties. Click Update to save the changes.